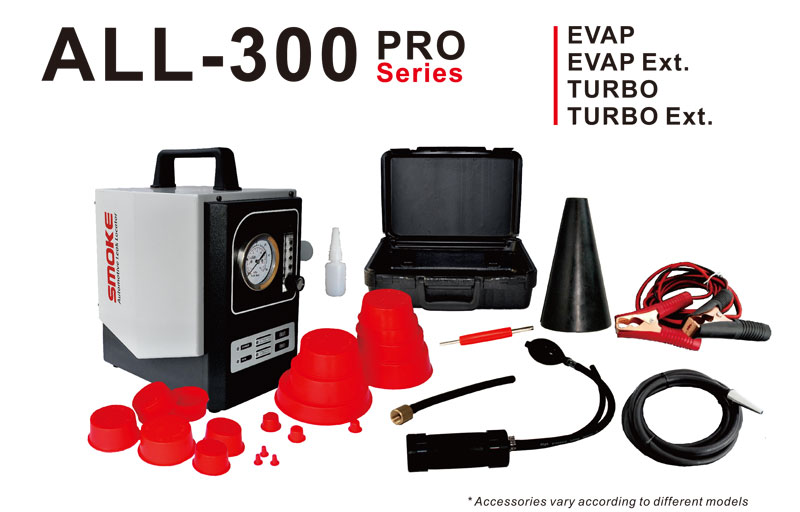
Introduction
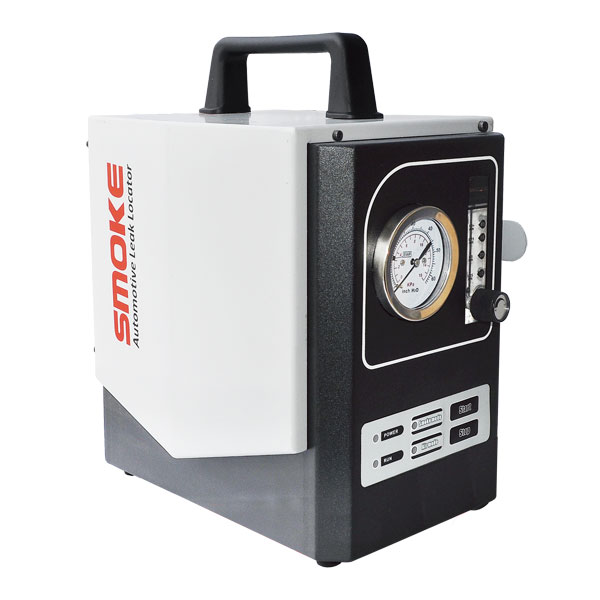
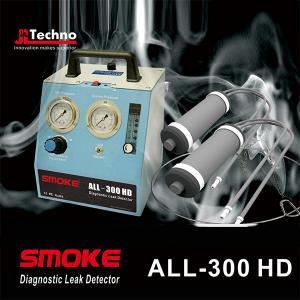
The ALL-300 Pro Series Automotive Diagnostic Leak Detector is designed for test leaks in vehicle pipe systems. It could be used on all cars, motorcycles, snowmobiles, ATV, light trucks, boats, etc.
-
Turbo Model also applicable on turbo system, but NOT suitable for EVAP system.
-
EVAP Model also applicable on EVAP system, but NOT suitable for Turbo system.
-
EVAP/Turbo Model is with internal air compressor, while EVAP/Turbo Ext. will need shop air supply with air pressure recommended at less than 8bar/90psi.
Feature
-
Fit all passenger car systems
-
Inbuilt air compressor with smoe flow rate up to 10L/min, or with external shop air support up to 20L/Min
-
DC 12V vehicle battery driven
-
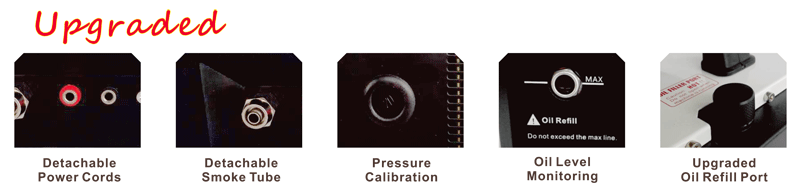
Support UV detection method for tiny leaks1
-
Equipped with pressure gauge and flow adjustable meter to ensure quick diagnosis of leak status
-
Instant smoke output
-
Dual working mode switchable at anytime:Air mode/ Smoke mode
-
Smart 5 minutes working cycle control
1
UV detection Kit required
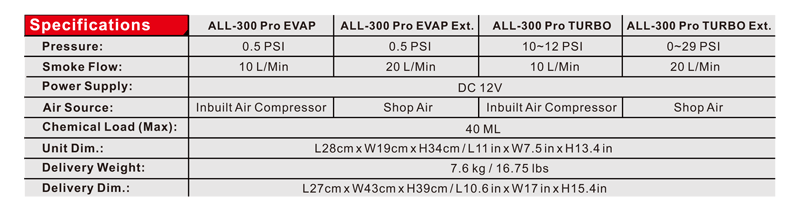
Specifications
Accessories Configuration
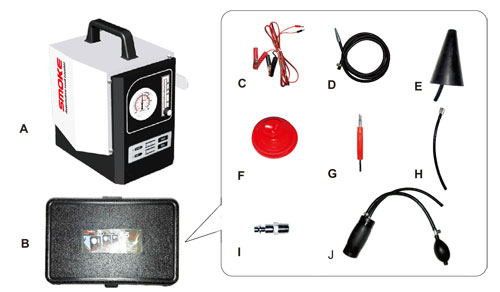
Inside the Package you could find:
A. Main Unit
B. Plastic Case
C. Power Cords
D. Smoke Tube
E. Intake Adaptor Cone
F. Cap stopper(set)
G. Shrader Valve Tool1
H. EVAP Service Port Adaptor1
I. Shop Air Connector2
J. Universal Intake Adaptor3
1 For EVAP Models ONLY
2 For Ext.(Shop Air Version) Models ONLY
3 For Turbo Models ONLY
Start Guide

Prepare the Unit
-
Mount the Power Cords to the Power Inlets(A). Note: Red plug to red socket and black plug to black socket.
-
Mount the Smoke Tube to the Smoke Outlet(B) , and lock it with the quick clamp. or rest them on the Rack(E). Note: Use the Velcro Strap( D) or the Rack(E) to collect the Power Cords and the Smoke Tube before storage.
-
Open the Oil Filler Port(F),fill smoke oil into the reservoir, note the Oil Level Indication Window(K), make sure the oil level do NOT exceed the Max line(middle of the window). If the smoke oil is overfilled, turn the unit upside down to drain some oil out.
-
Now the unit is ready to use. Note: Pay attention to the Oil Level Indication Window(K) before use. If the oil level is close to the bottom, the unit will need a refill.
Test Run
-
For EVAP/TURBO Ext. models, mount the Shop Air Connector to the Shop Air Inlet Port(C), the unit will start generating air pressure.
For EVAP/TURBO models, connect 12V vehicle battery with the clamps on the Power Cords. The Power status LED (G) will be ON and the unit will start generating air pressure.
Note: red clamp to positive(+), and black clamp to negative(-).
-
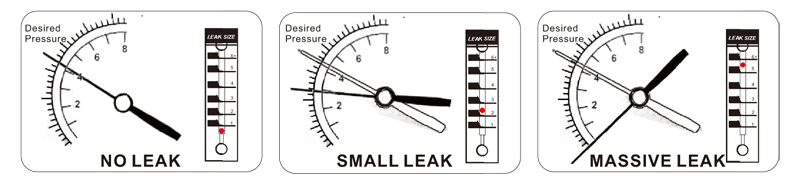
Turn the Flow Dial(H) to max, the Flow Gauge(I) will indicate the flow rate.
-
Block off the smoke nozzle on the Smoke Tube with finger tip, the Pressure Gauge(J) will indicate the real time output pressure.
Note: If the pressure is out of range, take off the cover at the Pressure Adjustment Port(L), then use a cross screwdriver to adjust the output pressure.
Note: If the pressure is out of range, take off the cover at the Pressure Adjustment Port(M), then use a cross screwdriver to adjust the output pressure.
-
Select Smoke Mode(G) and press Start Button(G), the Operation Status LED (G) will be ON. The unit will start producing smoke and stop automatically when a 5 minutes’ working cycle is finished. Or press the Stop button(G) anytime to stop the unit manually.
Generic Operation
-
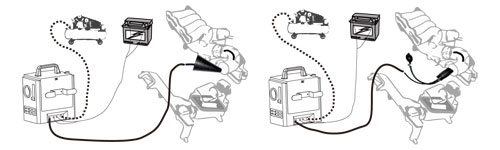
Turn OFF the ignition of the vehicle. LEAK TEST OF VEHICLE SYSTEMS REQUIRE THE ENGINE TO BE OFF.
-
Unmount the Air Filter, and the Throttle connections.
-
Clean the opening and avoid sharp objects before put the adaptor in.
-
Put the Intake Adaptor Cone(or the Universal Intake Adaptor) into the opening.
-
Connect the unit with shop air supply.(Ext. models ONLY)
-
Connect Power Cords to 12V vehicle battery. For best performance, the vehicle battery shall be fully charged. Do NOT use a DC12V switch power supply.
-
Now the unit shall generates pressurized air flow.
-
Turn the Flow Dial to max, then introduce the smoke nozzle into the system via the Intake Adaptor Cone(or the Universal Intake Adaptor).
-
Wait for 30 seconds for the system to pressurized.
-
Observe the Flow Meter and the Pressure Gauge for leak status.
-
If there’s leak in the system, select the Smoke Mode then press the Start Button, the unit will start generating smoke for an auto-stop 5 minutes working cycle.
-
Pull off the smoke nozzle, and plug it back again when there’s obvious smoke coming out of the smoke nozzle.
-
The system will be ready for leak check in 2 minutes. Use a bright light torch or working lamp to assist.
-
After leak test, collect the Power Cords and Smoke Tube with the Velcro Strap or the Rack, clean the Intake Adaptor Cone(or the Universal Intake Adaptor) before storage.
Note:
-
Cap Stoppers could be used to block off various opening, if test on partial of the whole system is required.
-
Cap Stoppers also could be used to block off the intake, and smoke nozzle connect to the system via other opening available.
-
Smoke method can NOT be used on testing leak of oil-sensitive parts, eg. lamp housing.
-
ONLY 12V vehicle battery are allowed to be used as power supply for the machine.
EVAP Leak Test (EVAP Models ONLY)
Generic OBD EVAP related codes:
-
P0443 Purge Control Valve Circuit
-
P0444 Purge Control Valve Circuit Open
-
P0445 Purge Control Valve Circuit Shorted
-
P0446 Vent Control Circuit
-
P0447 Vent Control Circuit Open
-
P0448 Vent Control Circuit Shorted
-
P0449 Vent Valve/Solenoid Circuit
-
P0450 Pressure Sensor
-
P0451 Pressure Sensor Range/Performance
-
P0452 Pressure Sensor Low Input
-
P0453 Pressure Sensor High Input
-
P0454 Pressure Sensor Intermittent
-
P0455 System Leak Detected(gross leak)
-
P0456 System Leak Detected(very small leak)
-
P0457 System Leak Detected(fuel cap loose/open)
-
P0465 EVAP Purge Flow Sensor Circuit
-
P0466 EVAP Purge Flow Sensor Circuit Range/Performance
-
P0467 EVAP Purge Flow Sensor Circuit Low Input
-
P0468 EVAP Purge Flow Sensor Circuit High Input
-
P0469 EVAP Purge Flow Sensor Circuit Intermittent
Procedure
-
Locate EVAP Access Port(Green cap in engine compartment)
-
Remove the Schrader Valve, by using the Schrader Value Tool. Note: The valve is left-hand thread.
-
Mount the EVAP Service Port Adaptor.
-
Connect the smoke nozzle to the EVAP Service Port Adaptor, introduce pressurized air into the system, turn the Flow Dial to max, check the status of Pressure Gauge and Flow Meter to confirm if there is a leak.
-
If there’s leak in the system, press the Start/Stop Button, the unit will start generating smoke for an auto-stop 5 minutes working cycle.
-
Pull off the smoke nozzle, and plug it back again when there’s obvious smoke coming out of the smoke nozzle.
-
In 2 minutes, the system will be ready for leak check. Use a bright light torch or working lamp to assist.
-
After leak test, collect the Power Cords and Smoke Tube with the Velcro Strap or the Rack, clean the Intake Adaptor Cone(or the Universal Intake Adaptor) before storage.
Instruction on Universal Intake Adaptor
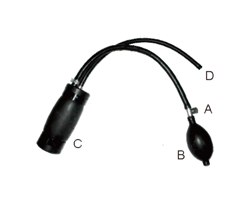 This parts comes with TURBO models ONLY.
-
Clean the inner wall of the intake opening while the Air Filter, and the Throttle connections are removed, so as not to scratch the adapter.
-
Close the Pressure Relief Valve(A) next to the Hand Pump(B).
-
Put the Rubber Component(C) into the intake opening.
-
Inflate the Rubber Component(C) by pressing the Hand Pump(B) till the intake opening is tightly sealed.
-
Now the system is ready to test, introduce air/smoke into the system by plug the smoke nozzle into the Tube Opening(D) .
-
After test, pull off the smoke nozzle, release the inflated air by open the Pressure Release Valve(A) next to the Hand Pump(B).
-
Clean the adapter for storage, avoid contact with corrosive liquids.
Smoke Oil
 J&L Techno recommend and will supply our own formula together with the product, but the oil may not come together with the shipment due to custom/carrier companies regulations. Instead, the alternative is to use Paraffin Wax/Baby Oil/Mineral as smoke oil, available in most supermarket or pharmacy.
Overfill: Turn the unit upside down to drain some oil out.


 Leslie